To “rehab” an injury through a fascial lens, we move away from just looking at the “spot that hurts” and start looking at the chain that failed. If your knee hurts, the knee is often just the victim of a “tug-of-war” between the hip and the foot.
Let’s look at one of the most common injuries for riders, athletes, and stable hands: Low Back Strain/Compression.
The “Detective” Phase: Which Chain is Pulling?
Lower back pain is rarely a “back” problem. It’s usually a failure of one of these three chains:
- The “Short Front” (SFL/DFL): Your hip flexors or abs are so tight from “bracing” or sitting that they are pulling your pelvis forward, “arching” your lower back into a pinch.
- The “Glued Heel” (SBL): Your calves and hamstrings are so tight that when you bend over, your pelvis can’t tilt. Your lower back has to “snap” to make up the distance.
- The “Rotational Torque” (Spiral Line): One side of your back is working harder because you always toss hay or turn your horse in one direction.
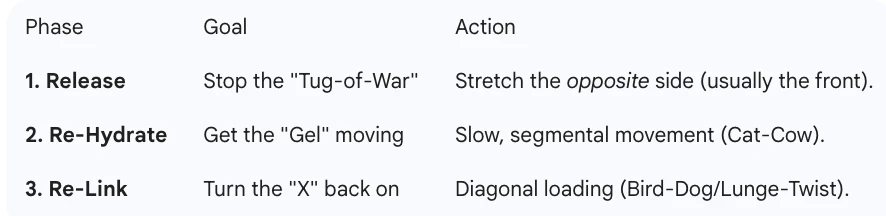
Phase 1: “De-Tensioning” the Antagonist (0–2 Weeks)
If the back is hurting, it’s being “pulled” by something else. We have to release the antagonist (the muscle on the opposite side).
- The Target: The Deep Front Line (DFL) and Superficial Front Line (SFL).
- The Move: The Low Lunge. Put your “pain side” knee on the ground and step the other foot forward. Squeeze your glute and push your hip forward.
- The “Chain” Secret: Reach the arm on your “knee-down” side toward the ceiling and lean slightly away. This “unzips” the line from the knee to the fingertips.
Phase 2: “Re-Hydrating” the Victim (2–4 Weeks)
Now we need to get fluid back into the lower back fascia without “over-stretching” it.
- The Target: The Superficial Back Line (SBL).
- The Move: Cat-Cow Segmentation. On all fours, don’t just “flop” your back up and down. Try to move one vertebra at a time, starting from your tailbone.
- The “Chain” Secret: Imagine your spine is a bicycle chain. You are trying to get oil (hydration) into every single link. If one area feels “stuck” or “flat,” stay there and breathe into it.
Phase 3: “Re-Integrating” the Anchor (4+ Weeks)
An injury happens when a joint feels “unsafe.” We have to prove to the brain that the chain can handle a load again.
- The Target: The Functional Lines (The “X”).
- The Move: The Bird-Dog. On all fours, reach your right arm forward and left leg back.
- The “Chain” Secret: Don’t just lift them; reach them. Try to make yourself as long as possible. This tensions the Back Functional Line, teaching your opposite shoulder and hip to work together to protect your spine.
Summary: The Rehab Roadmap
The “Golden Rule” of Fascial Rehab
Never work into “Sharp” pain. Fascia responds to “stiffness” or “dull aching” with hydration, but it responds to “sharp” pain by tightening further. If it’s sharp, back off 10% and move slower.